Advertisement

Showing posts with label Tardis. Show all posts

Friday, March 7, 2014

Lighted Tardis is Basically Finished

I finally got the lighted Tardis finished (mostly).  Tonight, I 3D printed some windows with glow-in-the-dark filament on the Makerbot at the Milwaukee Makerspace.  I also printed the top of the lamp.  Next, I used super glue to attach the windows and top piece to the rest of  Tardis.  Finally, I super glued the battery holder piece to the bottom of the Tardis.  I still have to attach the papers saying "Police Box" to the sides.

Overall, I think it turned out well.


#tardis, #3dprinting

Saturday, February 15, 2014

Tardis Lights Mostly Wired

Yesternight I was at the Milwaukee Makerspace. I wired up the LEDs for the Tardis I 3D printed a month or so ago. While I was there, I also 3D printed four more white bases for the wobbly chess set.

Last weekend, I bought six ultra-bright white LEDs from Radio Shack.  They will go into the top of the Tardis.  The plans for the Tardis on Thingiverse included a support that will hold four small LEDs.  A fifth LED will go into the top of the Tardis.

I used the circuit shown below that I got from a website that helps design circuits for LEDs.  (See this blog post for details about the circuit design.  Also, here is a link to the circuit below on Digikey's SchemeIt tool.)


I got the resistors, some wire, and a 9v battery plug at the Makerspace.  Below are some pictures of the soldered together LEDs both outside of the Tardis and then installed inside it.  I still have to wire in a switch that will attach to a special pieces in the bottom of the Tardis.  My son thinks I should put some kind of pushbutton switch on the top of the Tardis.  I'll have to look into that.  Finally, one of the windows for the Tardis are no longer in my locker.  I'll have to print another one.  Then, I can assemble the lights into the Tardis.


Saturday, December 28, 2013

LEDs for Tardis

I was at the Milwaukee Makerspace yesternight to look for LEDs and research a circuit for the LEDs to add to the Tardis.

I did find some LEDs that fit in the light holder but there weren't any white ones.  I need five ultra-bright white LEDs.  The power source will be one 9v battery.

I talked to Ron about how to figure out what resistors to use and then did some research on the internet.  I found an Instructable that explains the process.  The Instructable pointed me to a website that will calculate the resistors needed in a five LED array.

Here is one of the schematics that the website came up with.


I tested the circuit on a breadboard and it worked.  None of the LEDs blew up. 

Next, I need to get some ultrabright white LEDs.  I might even have to go to the 'Shack. 

Friday, November 22, 2013

Second Tardis Printed and Painted

I was at the Milwaukee Makerspace this afternoon working on several projects.  One thing I was able to do is finish printing all of the pieces of my second Tardis.  I printed the battery holder and lamp cover with the red filament.  Then, I printed the windows and the lamp with the glow-in-the-dark filament.

Next, I painted all of the pieces on both sides in navy blue spray paint in the 'spaces paint room.  At first, I was concerned that the blue would not cover the filament colors but they turned out good.

The next step is to find LEDs and the other electrical components to install the lighting inside the Tardis.  The guy who designed this sells a kit for $12 but I'm going to try to scrounge up the parts myself.


Saturday, November 16, 2013

Second Tardis is Mostly Printed

I am printing a second Tardis on the 3D printer at the Milwaukee Makerspace.  This time, I am making it more solid.  Plus, I am going to install a small circuit to power LEDs and light up the top.

Yesternight I printed the open base piece, and both top pieces.  The only pieces left to print are the lamp pieces and the battery piece.  I should be able to print the rest of the pieces in one day provided that the printer works with no problems.  Lately, it has been working great!

The picture shown here has the pieces printed so far except the ring top piece.  They are different colors because I used different colors of filament.  All of the pieces will be spray painted navy blue later.


Friday, November 8, 2013

Started Second Tardis

I started 3D printing a second Tardis. Now that I know what I am doing on the 3D printer at the Makerspace, they are coming out much better.  This time, I am printing the sides with 90% infill to make them stronger.  

As you can see from the picture, the blue filament ran out after the first print so I switched to green.  They will all get spray painted navy blue when all the pieces are printed.

I hope to put electrical wiring in this Tardis to make it light up.

By the way, these three pieces took a bit over nine hours to print.

Thursday, August 22, 2013

Tardis Assembled

Stopped off at the Milwaukee Makerspace tonight to assemble the pieces of the Tardis.  I glued on the window pieces and the top of the light.  It really looks nice.

Gave it to my son Dmitry as a (slightly) early birthday present.


Also, I brought Joe from work to the 'space to show him around.  He had a small project to make some kind of adapter for a motor.  It was a problem that he had been trying to solve for months.  We talked to Tom and Jim from the Makerspace about it.  They had an idea to fix it in about five minutes.  After about one hour, they had fabricated exactly what Joe wanted out of a 3/4" nut.

Another great day at the Makerspace.

Saturday, August 17, 2013

Tardis Printed & Painted / First Laser Cutting

Its only about two weeks until Dima's birthday and I need to get the Tardis finished.  I spent a few hours at the MakerSpace this afternoon working on that.  I managed to print the final two sides of the Tardis with no problems.  Next, I spray painted all of the parts navy blue.  I'll give them a day to dry and then assemble them.  I might have to punt on the electrical for now just to get it done in time for his birthday.


While I was here I got someone to help me laser cut some pieces for Anna's rabbit hutch.  It came out okay.  I had to print the shapes four times to get the laser to cut all the way through.  Even then, I had to pop out the pieces.  The sides needed sanding because there were some share edges and the edges are not exactly square.  I guess I need some practice but these pieces will do fine for now.  I need to cut two or three more pieces to cover all four sides if the cage.


Another great day at the Makerspace.

Saturday, August 10, 2013

3D Print Figured Out (?) and Other Stuff

Jacob and I went to the Milwaukee Makerspace this afternoon.  I worked on several things.  Jacob played a lot on the pinball machine and was bored some of the time but I think he enjoys himself.

First of all, the Makerspace hosted an event called "Fix-It Milwaukee".  People were invited to bring broken stuff to the space and the Makers would try to fix them.  I was surprised about how many people were bringing in their things to get fixed.  It was really well attended.

My main goal today was to laser cut the acrylic for Anna's rabbit hutch.  I have a piece of acrylic that I can cut 10cm high rectangles out of.  The pieces will get attached to the insides of the hutch at the bottom.  The acrylic will keep the bedding (and poop) from getting kicked out of the hutch and all over the floor.  I made a drawing of a 24"x16# piece of acrylic.  Then, I drew rectangles in that piece.  I did all of this in Inkscape on my Ubuntu laptop.  I was told that I could then import the Inkscape document into Corel Draw.  Corel is what controls the 60 watt laser cutter at the 'space.  The reality is that Corel Draw does not work well with Inkscape documents.  I tried several things including saving the document as a PDF file and then trying to import that into Corel.  Nothing worked.  When I asked people who use the laser cutter how they make their documents, they all either have a paid for version of Corel or Adobe Publisher.  I need to figure out a better way.  All I want to do is cut out a rectangle.

I was able to make good progress 3D printing Tardis parts.  Dave Buggs helped me get the right settings for the base and sides.  I was able to successfully print the open base and the front door.  The settings I used were:
  • infill: 30% 
  • shells: 2
  • layer height: .20 mm
  • extruder temp: 235 degrees C
  • build plate temp: 110 degrees C

Next time, I will try to re-print the sides.  If these print okay, I will have all the pieces printed.  I also bought a can of navy blue spray paint.

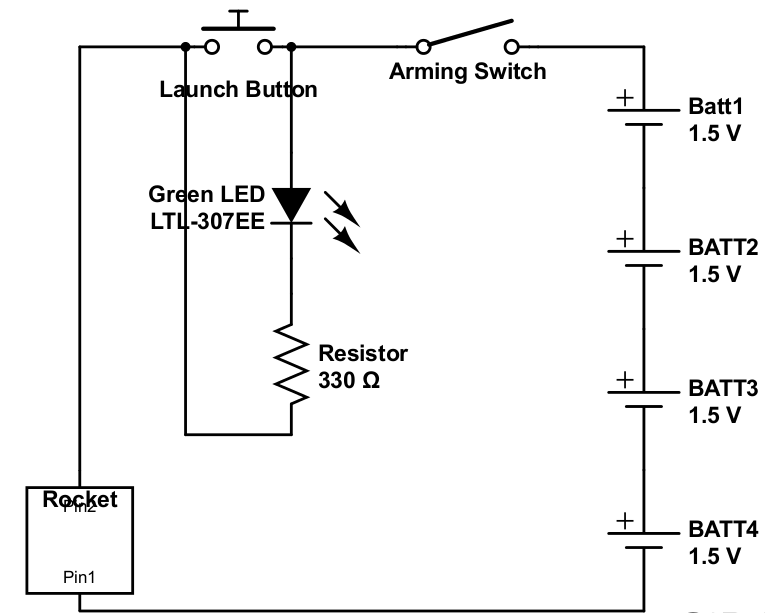
In between prints, I got some help with my rocket launcher from Dave Buggs and Bill Murray.  What we finally figured out is that when the button is pushed, the current is going to ground and not to the rocket.  I think I need to re-design the circuit slightly.  I did some research and came up with a new circuit design.  When I get time, I will re-do the wiring.  Hopefully, that will fix the problem.


Finally, there were some guys there talking about alternative energy.  They told me about a solar kit that Harbor Freight sells that would be good for experimenting.  That is a project for another day.  I'd like to install that on my shed and use the power a light and fan.

Friday, August 9, 2013

A Bit More 3D Printing

I spent a few more hours at the Makerspace tonight trying to print more Tardis parts.  This time, I changed the Infill setting on the Makerbot Replicator to 0% and raised the temperature on the stepstruder to 235 degrees Celsius.  It seemed to complete the side panels more than it did the first time but they still are not 100% complete (see the picture below).  It did not fill on all the gaps.  Not sure why.

When I got to the space, someone was printing Star Trek badges.  However, the extruder was blocked and not printing anymore.  I took some time to print eight of the badges (see below).

Finally, I bought a BeagleBone Black the other day.  It arrived yesterday and I fired it up tonight.  Plugged the included USB cable into my laptop running Ubuntu Linux.  The computer found the board just fine.  However, I could not get Cloud9 to show me any of the code installed on the Black.

Someday, I hope to install this in my Home Environmental Sensor Array instead of the Raspberry Pi.

Friday, August 2, 2013

More 3D Printing and Other Stuff

I spent a few hours after work at the Makerspace tonight.  My main goal was to print more of the Tardis pieces.  I was moderately successful.

The Makerbot Replicator finished eight more of the parts -- the two pieces of the top, all four windows, and the two parts for the light on the top.  The extruder stopped printing once or twice.  I had to remove the filament and reload it.  Now, I know how to do that.

Also, I could not get the base or front to print correctly.  I am not sure if it was the settings I used or something with the printer.  The settings for these pieces was:

  • Infill: 5%
  • Shells: 1
  • Layer height: 0.2 mm
The settings for the pieces that worked better had an infill of 0%.  Maybe I will try printing again with 0% for the infill setting.


While I was waiting for the pieces to print, I helped Dan do some blacksmithing on the forge.  I held the heated piece on the anvil while he used a hammer and chisel to make a line on it.  Dan cut the work into small pieces that he then wrapped around other metal parts that he had forged earlier.  The end result was a trivet.

Finally, I spent some time soldering the wires in my rocket launcher.  It will now accept power from external sources.  The stupid LED still does not light but I was able to pass about 12v through the circuit.  The next step is to test it with a rocket ignitor.

Sunday, July 28, 2013

My first 3D printing experience

The Milwaukee Makerspace has several 3D printers.  One of them is a Makerbot Replicator.  I was able to use the printer tonight to start a project that I saw on Thingiverse.

I am going to make a Tardis from Dr. Who for my son Dmitry's birthday (shhh. Don't tell him).  Here is a link to the project on Thingiverse.  The extruder material we have at the 'space is white so I will need to paint it blue.  I also might install the lights if I am ambitious.

The process was very easy.

First, I had to download the Makerware software from the Makerbot website.  I have a portable running Ubuntu so I had to download the version for Ubuntu 12.0.4 LTS.  By the way, to figure out what version of Ubuntu you have, type "lsb_release -a" at the command prompt.  the Makerbot website has excellent step-by-step instructions and the install process was very easy.

Next, I downloaded the 3D printable images from Thingiverse.  The files came down as a zip file.  I unzipped it to the folder.  Again, very easy.

The next step was to open one of the stl files in Makerware.  I tweaked a few of the settings for the Replicator and based on recommendations from the Thingi author.  Makerware saved the "g-code" files to an SD card.

The SD card was inserted in the Makerbot's SD card slot.  I kicked off the print and sat back to wait.

The first piece I printed was one of the side panels.  It took almost an hour to print.  It looks like it stopped early.  Not sure what happened.  Maybe the extruder jammed.  (Update.  The side panel did not printer correctly.  The picture shows the back of the door.  The front did not finish printing.)

I also printed two other pieces.  They appeared to print correctly.

That was enough for one night.  I will do some more printing another day.

Another great time at the Makerspace.  Thanks to Joe B. for his help.