Advertisement

Thursday, December 28, 2017

Setting up an EdgeRouter -- Blocking by device and time

In may last post, I described the initial setup of my new EdgeRouter X by Ubiquiti.  I connected it to my ISP, and pointed it to OpenDNS as the DNS server. Now, I am going to setup a rule to block access to the internet for specific devices at specific times. In this way, I can effectively turn off the internet for my kid's devices overnight without turning off my internet access. Plus, each kid can have a different schedule. If I want to take away internet access as a punishment, I can easily do this by changing the settings for the specific kid's rule.

First Failed Attempt
As an aside, on my first attempt, I managed to block all traffic on my internal network.  I created a ruleset that dropped all packets as a default action.  I turned it on for the interface for the switch and immediately lost connection to the router.  The only way to fix it was to reset the device to factory settings and start over.  Doh!

Resetting the Router
There are several ways to reset the router.  I tried simply holding in the reset button while the device was powered on.  This did not seem to do anything.  In order to get the reset to work, I had to push in the reset button, then plug in the power until the reset sequence finished.

One other thing.  After I changed the IP address of the switch to 0.1, I had to plug the cable from my PC into port eth1 on the switch.  It took me a few minutes to figure out why I could not connect to the switch while plugged in to port eth0 after it was configured to connect to the internet on port eth0.  Maybe this will help someone who reads this blog.

Configuring the Router to Block Traffic
Here are the steps I followed to configure the router.

After logging in to the device, I clicked on the Firewall/NAT button and then the Firewall Policies tab.

I clicked on the "Add Ruleset" button and created a new ruleset named "Blocking".  This ruleset will contain all of the rules for each device I want to block on my network.  The default action is set to Accept all traffic.  This way, all traffic is allowed by default.  The firewall will only block traffic for specific rules.  The mistake I made was to set the Default Action to Drop.


After saving the new ruleset, I clicked on the Actions dropdown for the new Blocking ruleset and chose the Interfaces option.  I set the Interface to eth0 and the Direction to out.  The ruleset was now finished after saving it.


The next step was to create a default rule.  I clicked on the Actions dropdown and chose "Edit Ruleset".  Next, I clicked on the "Add New Rule" button.  On the Basic tab, I entered a description that was for the device I wanted to block.  The Enable box was checked by default.  Drop was selected as the Action.  (Reject would have also worked.)  The "All protocols" radio button was selected.  I did not choose logging because I don't want an entry in the log for every blocked packet.  Here is a screen shot of the settings.
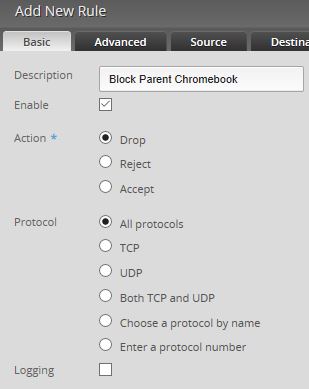

That is it for the Basic tab.  Nothing needs to be set on the Advanced tab. 

The MAC Address of the device to block is entered on the Source tab.  I could also use the IP address to identify the device but that is easy for a kid to change.  In theory, the MAC address can also be spoofed to get around the rules.  If I find out that they are doing that, I will have to drop all packets by default and make rules to allow traffic by specific MAC address.
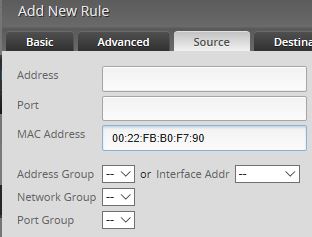

Finally, the time to block the device is entered on the Time tab.  In this case, I wanted to block traffic from this device from midnight to 4am every day.  I could have blocked traffic for certain days and could even make multiple rules for the same device to have different times during the week and on weekends.


That is it.  Now that I have one rule made, I can use the Actions button to copy the rule and simply change the MAC address and time for each kid's device.

Saturday, December 23, 2017

Setting up an EdgeRouter, Part I

Introduction
Ever since my kids got devices that could get on the internet, I have been looking for ways to manage and monitor their access.  We do randomly check their devices for "bad stuff" and we talk about what they should not be doing on the internet.  Those are good, basic steps that any good parent should take.

I always point my routers to OpenDNS as the DNS server to filter out objectionable content.  I am sure that helps, but savvy kids could install VPN apps to get around this.

Finally, the wireless AP is setup to turn off the wireless radios at 10:00pm until 4:00am.  This keeps the kids off of the internet on their phones overnight since they don't have data plans.  Also, they are supposed to leave their phones downstairs for charging overnight so they can't play offline games.  The downside is that all wireless devices are affected by this and not just the kid's phones.

What I need is a router that
  1. allows me to block internet access at specific times for specific devices
  2. allows me to see what sites people are going to
  3. allows me to block access to VPN by device. I sometimes need to login to work using VPN.  I can't just block all VPN access.
Hopefully, the EdgeRouter X by Ubiquiti will let me do everything I want.

I bought an EdgeRouter X on Amazon for about $50.  There are more expensive models but this one seemed like it would do everything I wanted.  Plus, we have Amazon Prime right now so shipping was free.  Some people said that the router stopped working after a few days.  Amazon offered buyer protection for <$2, so I paid for that as well.  If I get a lemon, I hope they will give me my money back.

Initial Thoughts
If you read reviews of the EdgeRouter, some people complain that it is hard to setup.  I did not find that to be true at all.  I am in IT but I am not a network engineer and do not work with routers normally.  So, configuring the EdgeRouter is by no means something I can do without help.

The manual that the router comes with is simply a quick start guide.  It explains how to plug everything in and nothing more.  You need the full user guide to get anywhere.  Fortunately, that can be downloaded from the Ubiquity website.  I have not read much of it yet but, at 104 pages, it appears to be pretty comprehensive.  Also, I have had good luck googling things.  Some of the information Google finds is outdated but still helpful.

Setting up to Connect to the Internet
The main thing I need the EdgeRouter to do is connect my home network to the internet through my cable modem.  This was very easy to setup. 

First, I followed the instructions in the quick start guide to power up the EdgeRouter.  I plugged a network cable from my laptop into port ETH0.  Then, I configured the Ethernet port on my laptop to have a fixed IP address of 192.168.1.1.  I brought up the web configuration interface and logged in as the ubnt user.

There is a wizard to configure the device to connect to the internet.  The user guide says that the wizard is named, "Basic Setup".  However, my device did not have a wizard with that name.  Fortunately, the "WAN+2LAN2" wizard is the same as the Basic Setup wizard.  I used the WAN+2LAN2 wizard and followed the instructions in the user guide for the Basic Setup wizard.

For the internet port choices, I left the defaults.


The wizard screen also has a section to setup the LAN.  You need to expand the section at the bottom of the screen to see the choices.  One thing that through me off a bit is the DHCP setup.  The address box is for the default address of the switch for the LAN.  This is the address that DHCP will give to the clients as the router address.  At first, I thought that this box was for the lower IP address setting.  I set the address as 192.168.0.1.


Also, by default, the software starts the DHCP IP range at .38 and ends it at .243.  That is more than enough for a home network.

The last step is to click the Apply button and reboot the router.

Physically Connecting to the Cable Modem
It took a bit of fiddling to get the router installed on my network.  I connected the Ethernet cable from the cable modem to eth0 on the EdgeRouter and powered up the EdgeRouter.  The cable modem's network light lit up to indicate that the EdgeRouter was connected.  However, I could not get to the internet even though I could see that the EdgeRouter had a routable IP from my ISP and was downloading traffic.  A simple reboot of the cable modem and the EdgeRouter fixed the problem.

OpenDNS
Setting up the EdgeRouter to use OpenDNS was a bit harder but still pretty easy.  The user guide does not specify how to do this.  Fortunately, I am not the only one who tried to do this.  Google to the rescue.

Part of the configuration can be done with the gui tools in the EdgeOS.  Part of the configuration must be done by entering unix commands into the Command Line Interface (CLI).

First, I clicked on the System button in the bottom-left corner of the screen.  This brings up the System configuration screen.  I entered the two OpenDNS server IP addresses in the system name server box.  Those addresses are 208.67.222.222 and 208.67.220.220.  I also added the local IP address of 127.0.0.1 and saved those changes.


Next, I opened up the CLI interface and logged in as an administrator.  I entered the following commands in the interface.
configure
set service dns forwarding system
commit
save
exit
exit

Finally, I had to go to the OpenDNS web site and refresh my network's IP address.  It took about five minutes for the OpenDNS servers to propagate my changes but eventually OpenDNS was doing it's job.

That's it for now.  I have my EdgeRouter connected to my cable modem.  I can get to the internet and am using OpenDNS for the DNS servers.  

Next, I want to configure the router to block specific devices from accessing the internet at specific times.


Friday, January 22, 2016

Uncanny Movie

I just finished watching the movie Uncanny on Netflix.  It's a science fiction movie about a guy working on artificial intelligence.  He created an android and made it as lifelike as possible.  He calls himself an illusionist.  The android is incredibly lifelike and creepy.

This movie appeals to me as someone who is into robotics, AI, making, and science in general.  It's an intellectual thriller.  I enjoyed watching it and would like to watch it again.  The ending was a surprise but more because of how unlikely it seems when you think about how the android and the maker acted during the week.

I am left with feeling confused and a bit creeped out at the same time.


Friday, January 1, 2016

Setting up Multiple WAP Routers on a Home Network

I have a main WAP / router (Netgear WNDR3700v4) in my house that connects to the cable modem (Motorola Surfboard SB6141) and the outside world.  I also have a second WAP (Cisco RV220W) and a wired-only router (D-Link EBR-2310) on my home network that extend the network.  Only the main router provides DHCP functionality.  The other devices connect to the main router through a LAN port.  This works fine but the secondary devices do not connect to an NTP time server.  They also will not look for firmware upgrades.  Both of these functions go through the WAN port.  Since the WAN port is not used, the device will not automatically update its time nor firmware.

Today, I figured out how to fix that problem.  I found some good information at this web site.  Basically, the way to setup a secondary router on a home network is to give the WAN port a static IP address on the main network and put the LAN ports on a different network.  The LAN ports can give out IP addresses using DHCP.  The secondary router will use NAT to route traffic from the LAN ports to the WAN port.  The router thinks the WAN port is connected to the internet and will use it to connect to the NTP time servers.

It is a good idea to turn on the feature to return a ping on the WAN port on the secondary router.  Also, turn on remote management so you can get to the router from the home network.

My devices are configured like this.

Netgear (main router)

  • WAN IP: DHCP from ISP
  • LAN IP: 192.168.0.1
  • DHCP: On
Cisco
  • WAN IP: 192.168.0.1
  • LAN IP: 192.168.1.1
  • Remote management: 192.168.1.1:443
  • DHCP: On
D-Link
  • WAN IP: 192.168.0.11
  • LAN IP: 192.168.2.1
  • Remote management: 192.168.2.1:8080
  • DHCP: On


Electric Toothbrush Storage

I have an electronic toothbrush.  There is no good way to store it.  The toothbrush is too big to fit in a normal toothbrush holder.  Having the toothbrush standup on the sink is not good because the water builds up on the bottom and creates slime.

I saw an article in a Family Handyman magazine about how to store an electronic toothbrush on a wall using a strip of metal and a magnet.  The article mentioned connecting a strip of metal to a wall, then using a neodymium magnet to attach to the metal.   The toothbrush simply clings to the magnet because it has metal in it.

I happen to have a bunch of neodymium magnets from computer hard drives in my stash of junk.  Those magnets are very strong and are attached to pieces of metal that have built-in mounting holes.  I attached one of those magnets to the wall in my bathroom using drywall screws.

One added benefit is that the magnet appears to charge the battery in the toothbrush.


Friday, December 18, 2015

Simple Basement Storage Platform

I was at the Milwaukee Makerspace for the last time this year and possibly for the next few months.  Tonight, I spent my time making some simple basement storage platforms in the woodshop.  Altogether, I made four platforms.  The materials needed was:

  • Two (2) eight foot long 2x6 boards
  • Two (2) two foot by four foot, 1/8 inch thick sheets of hardboard
  • A handful of nails
The Makerspace has several great woodcutting tools that made the job go very quickly.  In about an hour, I had four pretty nice looking platforms.  The plan is to give them to a friend of ours from our weekly Bible Study group.


Merry Christmas!

Friday, November 20, 2015

Injection Molding Machine Simulator

For the last month or so, I have been spending my weekly Makerspace time working on simulating an injection molding machine on a microprocessor.  This is a project for work.  I want to setup a test environment to work with Mattec, our MES software used to control injection molding machines in our plastic parts plants.  To make a proper test system, I would like to send signals from a simulated injection molding machine into the system.

Beaglebone Black Fail
I first started working with a Beaglebone Black.  I was able to write a simple python program to turn LEDs on an off at random times.  However, that program only worked once.  After the first time, I could not get it to work.  Not sure what went wrong.  I may have fried the BBB somehow.  It still boots, I can connect to it.  I can execute BoneScript code.  I just can't get any python code to work.

At some point, (may have been before I tried the python code but also certainly after) I tried to upgrade the OS on the BBB to the latest version of Debian dates 2015-03-01.  I followed the same instructions from the last time I did this.  I did not get any errors creating the SD card.  When I bootup the BBB in install mode, the lights start flashing.  All three LEDs are supposed to light solid when the install is done.  However, this never happens.  I've tried several times with no success.

Raspberry Pi and Basic Simulation Definition
So, I moved on to the Raspberry Pi.  I wrote a program to randomly turn LEDs on an off.  If I ever actually get to use this on my test system, rather then turning on the LEDs, the Pi will send an electrical signal to an interface unit.  There will be a signal to say that the fill process is complete, one to say a cycle is complete, and one to indicate that the last piece produced was scrap.

Classes
A part of functionfunctionfunctionthe process, I learned how to use a Class to store data.  I wish I would have learned about this earlier.  I love using arrays in other languages.  There is nothing really like an array in Python.  However, a class is even better than an array.  I made a class that represents a molding machine with sub-classes for the sensors on the machine.  If I want to access the cycle time for the machine, I simply access the data at IMM10.Cycle.AvgTime.  Very cool!

Down Event Probability Using a Poisson Distribution
The machine class has a function that will calculate the probability that a machine will go down during a given cycle.  It uses the poisson distribution function to determine this.  Just input the average number of cycles per month and the average number of down events that machine per month.  The poisson distribution function uses these numbers to determine the probability.  Excellent!

General Python Program Functionality
Multiple machines can be defined with different fill rates, cycle times, scrap probabilities, and down probabilities.  The program continuously simulates cycles for each machine.  It will send a signal when the fill part ends, then another signal when the complete cycle ends.  Next, it decides if the machine functionfunctionproduced scrap during that cycle.  If so, it sends that signal.  Finally, it determines if the machine when down at the end of the cycle.  If so, it sets a timer and waits for the down event to end before resetting the fill and cycle timers.

Determining Times Randomly Using a Normal Distribution and scipy
The time for the fill and cycle are randomly determined based on the average times for that machine. The probability calculation is not a simply random number generator.  It gets a random time that is within one standard deviation of the average, assuming that the probability has a normal distribution.  This is better than a purely random number between the minimum and maximum range.  The probability could be outside of that range but should be normally close to the average.  In a future release, I'd like to add in some kind of randomality to generate outliers.

In order to generate this kind of random number, I had to install a Python library called scipy (www.scipy.org). That library has a function called "percent point function" that will compute the inverse of the cumulative distribution function of a standard normal distribution.

I'm not exactly how the function works, but if I send it a random number between 0 and 1, and tell it to use a mean of 40 and 3 standard deviations, its sends back numbers that appear to be distributed around 40.

Here is one helpful link that explains more about using scipy in this way:

scipy can be installed on the Raspberry Pi simply by typing  
sudo apt-get install python-scipy
Future Enhancements
For now, when a machine goes down, the duration of the down event is a purely random number between 5 seconds and 4 hours.  In reality, most down time events last less than five minutes, but some can last for days or weeks.  I'd like to have a formula that will mostly pick down event durations that are short but could pick longer ones.  I can't figure that out just yet.

Another future enhancement would be read in machine and sensor definitions from a text file or some other source.  It would be cool if the source data could be managed with a web page.  Then, I could control the parameters of the device remotely.

Also, the Raspberry Pi outputs about 3 volts.  If I need to generate more volts or a higher current, I might have to make a circuit board with transistors.

This brings us up to date.  I'll add more about generating random downtime durations later.