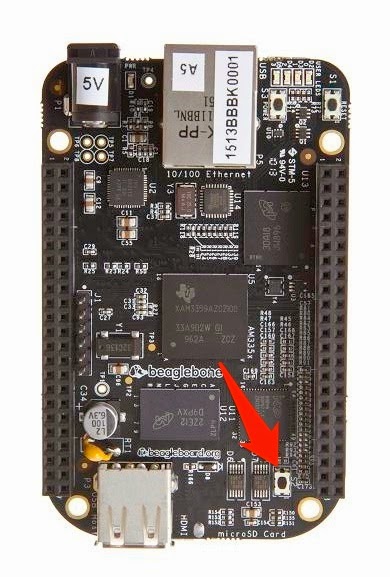
 First, I tried flashing the Angstrom distribution onto the eMMC of the BBB. To do this, I inserted a with the Angstrom image on it into the SD slot on the BBB. Then, I held down the boot button on the BBB while I plugged in to the USB cable from my Ubuntu PC. The BBB started installing the new image into the eMMC. After about an hour, all four LEDs on the BBB lit up signaling that the install was complete. I unplugged the USB cord from the BBB, removed the SD card, and reconnected the USB cable. The BBB powered up and the Ubuntu PC recognized it as an external hard drive.
microSD card
Next, I connected to the BBB by typing
sudo ssh 192.168.7.2at a terminal prompt. I typed
lsb_release -aat the BBB terminal prompt. It reported that I was running Angstrom GNU/Linux v2012.12. I wanted to install a version of Angstrom from 2013. To make a long story short, the image of Angstrom on the SD card was the 2012.12 version. So, the flash process probably worked all along but was not flashing the version I thought. Doh!
Now that I figure out what was happening, I decided to install a version of Debian Linux. There are two ways to run Debian on the BBB. One way is to install a bootable version of Debian on the microSD card. Then, if you power on the BBB while holding down the boot button, it will load the OS on the SD card rather than the OS on the eMMC. This might be safer than flashing the eMMC but it would mean that I could not reboot the BBB remotely or count on it coming up correctly if it lost power.
The second option for installing Debian on the BBB is to flash the eMMC with an image of Debian Linux. This is the option I chose and this is what I will describe below.
Searching the internet for help simply made me confused. There are a few websites that talk about doing this but the information is written for Linux experts (which I am not). Here are the steps I followed to get Debian Linux installed on my BeagleBone Black.
(I did this entire process on my Linux laptop. You could also do this on a Windows PC but some steps are different. I will also mention how to do this on a Windows PC, if applicable.)
Step 1: Download the latest image.
The latest Debian and Angstrom images can be found at http://beagleboard.org/latest-images. I clicked on the link named Debian (BeagleBone Black - 2GB eMMC) 2014-03-04. This is the image file that will flash the eMMC. The file was downloaded to my downloads folder in my home drive.
Step 2: Unpack the image.
The downloaded file is in a compressed format that is not usable as it is. The file must be uncompressed. In Linux, this is done with the unxz command. In Windows, you would need a program like 7zip to uncompress the image. Since I am using Linux, I typed
unxz BBB-eMMC-flasher-debian-7.4-2014-03-04-2gb.img.xzat the terminal prompt. The unxz program creates an image file in the same location that the xz was in and deletes the xz file.
Step 3: Copy the image to the SD card
The next step is to put the image onto a miniSD card. Insert the miniSD card into your PCs SD slot. Linux has a command called dd to write an image to a disk. In Windows, use a program called Win32 Disk Imager to do the same thing. Again, since I am using Linux, I typed
sudo dd if=./BBB-eMMC-flasher-debian-7.4-2014-03-04-2gb.img of=/dev/mmcblk0to write the image to the SD card. It took awhile to write the image to the SD card. I do not know exactly how much time but it was more than fifteen minutes.
dd is the program that writes the image. On my computer, mmcblk0 is the name of the SD card device. The device name may be different on your computer. Type lsblk at a terminal prompt in Ubuntu to see a list of your devices.
Step 4: Flash the eMMC on the BBB.
 This is probably the easiest part of the whole process. Make sure the power is off on the BeagleBone microSD card out of the PC and insert it into the microSD slot on the BBB. Then, hold down the boot button on the BBB while applying power. I held the button down until all of the LEDs were on solid. Then, I stopped pressing the button. The BBB started flashing Debian onto the eMMC. After about ten minutes, all four LEDs came on solid and stayed on. That is the signal that the process is complete. I unplugged power from the BBB and removed the SD card.
Step 5: Verify that the flash worked.
I connected the BBB to my Linux PC with the USB cable. This provides power to the BBB and it booted up. The Linux PC saw the BBB as a connected storage device. I connected to the BBB with ssh by typing
sudo ssh 192.168.7.2at a terminal prompt. I typed
lsb_release -aat the BBB terminal prompt. It reported that I was running Debian GNU/Linux 7.4 (Wheezy). Perfecto!
Update Linux
As a final step, I update Linux on the Beaglebone Black. I connected the BBB to an Ethernet cable to get it on the internet. Then, I plugged in a 5V power supply. When it booted, I used ssh to connect to it over my home network. I ran the following two commands to make sure it had all the latest updates.
sudo apt-get upgrade
sudo apt-get update
Next time, I will setup a user account for myself and install Avahi.
No comments:
Post a Comment