Advertisement

Friday, November 28, 2014

Power monitoring with the Moteino -- Attempt #1

This week, in my regular time at the Makerspace, I experimented with the Moteino I recently purchased.  I want to use the Moteino as a temperature sensor in my Home Environmental Sensor Array (HESA).  One thing I would like the sensor to do is measure the voltage coming from the battery and report it back to the host.  This way, I will know when a battery on one of the sensors is about to die.

The Moteino is fully compatible with an Arduino UNO.  Vishal from the 'space told me that the Arduino has the ability to determine the incoming power.  There is an internal reference voltage that always measures 1.1v.  This reference voltage can be used to more accurately measure the input voltage to the Arduino.  Here is a web page that talks about this in more detail.  That web page also has code to measure the input voltage.  Below is the code that I used to measure the voltage on my Moteino.  The output consistently read 3369 millivolts.
long readVCC() {  // Read 1.1V reference against AVcc  // set the reference to Vcc and the measurement to the internal 1.1V reference  #if defined(__AVR_ATmega32U4__) || defined(__AVR_ATmega1280__) || defined(__AVR_ATmega2560__)    ADMUX = _BV(REFS0) | _BV(MUX4) | _BV(MUX3) | _BV(MUX2) | _BV(MUX1);  #elif defined (__AVR_ATtiny24__) || defined(__AVR_ATtiny44__) || defined(__AVR_ATtiny84__)    ADMUX = _BV(MUX5) | _BV(MUX0);  #elif defined (__AVR_ATtiny25__) || defined(__AVR_ATtiny45__) || defined(__AVR_ATtiny85__)    ADMUX = _BV(MUX3) | _BV(MUX2);  #else    ADMUX = _BV(REFS0) | _BV(MUX3) | _BV(MUX2) | _BV(MUX1);  #endif     delay(2); // Wait for Vref to settle  ADCSRA |= _BV(ADSC); // Start conversion  while (bit_is_set(ADCSRA,ADSC)); // measuring   uint8_t low  = ADCL; // must read ADCL first - it then locks ADCH    uint8_t high = ADCH; // unlocks both   long result = (high<<8) | low;   result = 1125300L / result; // Calculate Vcc (in mV); 1125300 = 1.1*1023*1000  return result; // Vcc in millivolts}
void setup() {  // initialize serial communication at 9600 bits per second:  Serial.begin(9600);}
void loop() {  float voltage = readVCC();  // print out the value you read:  Serial.println(voltage);  }
BTW, after uploading the program to the Arduino, I opened the serial monitor by clicking on Tools, Serial Monitor.  The serial monitor displays the output from the Arduino.

Next, I wanted to see what the voltage would be from an external power source, as opposed to the Moteino getting power over the USB cable.  I connected 3.5v power from an adjustable power supply to the VIN pin on the Moteino.  The voltage displayed by the program never changes from 3369 millivolts.  I am not sure if that is because the Moteino was still taking power from the USB or if the built-in power regulator works with any power input.  

I plugged my Arduino Uno into the USB port on the computer and uploaded the script.  It consistently reported 5068 millivolts.  Adding 3.5v power from the external power supply on VIN did not change the readings.

I need to figure out how to get the Arduino or Moteino to send data back to my computer or maybe to a Raspberry Pi without using a USB cable.

Saturday, November 22, 2014

Started Working on Moteino Wireless Sensor Node

The Home Environmental Sensor Array is basically where I want it to be at this point.  It will:

  • detect water leaks and turns on a backup pump if water is found;
  • measure temperature and humidity in my basement;
  • write data to a SQL database on the internet;
  • send emails if it detects problems and send an "all clear" message when problems clear
The one thing I would like to do before moving on is have it record data locally if the internet is down and write it to the database after the internet connection is restored.

HESA Phase 2
However, I would also like to start on to the next phase of the project.  Originally, I thought that would mean adding an LCD screen and blinking lights as well as more sensors connected to the Raspberry Pi or Beaglebone Black.  But as my Maker skills have grown, I have gotten more ambitious.  Now, I would like to build wireless sensor nodes that connect back to the RPi base.  The nodes would collect data for things like temperature in rooms around my house and outside, monitor the freezer in the basement, etc.  Ideally, I will have a true network of sensors all around my house.  

Moteino Introduction
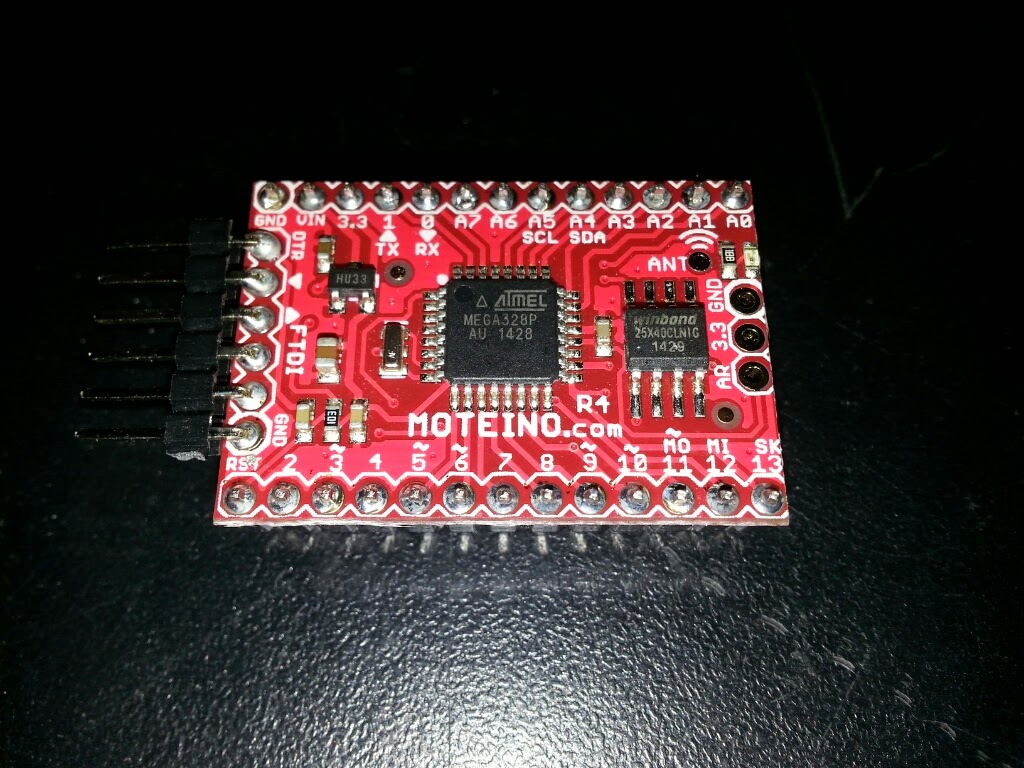
To get started on the wireless network, I purchased a Moteino. A Moteino is "a low cost low-power open-source wireless Arduino UNO development platform clone" that also has a HopeRF RFM69 transceiver.  My initial idea is to make a stand-alone sensor using the Moteino and a DHT22 temperature sensor.  Since the Moteino is an Arduino UNO clone, I can write a script to have it record the temperature in a specific location and send the results wirelessly back to my Raspberry Pi every few minutes.  (More about that later.)

The Moteino is made by LowPowerLab.  They also sell the Moteino and many other parts.  I bought one Moteino to start with along with the flash memory add-on, some header pins, and an external FTDI adapter so I can connect the Moteino to my PC with a USB cable.  (I suppose I could have made my own FTDI cable.  I researched making one and it seems too hard.  Now that I have the adapter, I can use it with any Moteino that I buy in the future.)  The Moteino comes with a strip of wire cut to the right length to serve as an antenna.  Finally, I also bought an extra HopeRF RFM69 transceiver that I would like to connect to my RPi.  (More on that later.)

Assembling the Moteino
I was at the Milwaukee Makerspace and used the awesome resources at the 'space to assemble the Moteino.  There is not much assembly required.  Basically, I just soldered the header pins to the board.  I am not sure if there is a side of the Moteino that is the top but I chose the side with the RF69 transceiver as the bottom.  This means that the pins that will plug into the breadboard or circuit board are on the transceiver side of the board.  I put the side pins for the FTDI adapter through the holes from the top of the board.

I put solder flux on the holes where the solder would go.  Flux is said to make the solder flow better.  One thing that makes soldering header pins easier is to put the pins into a breadboard and then set the board on top of the pins.  The pins are straight and will not move while I am soldering.  Soldering the pins is pretty easy.  I heat up the pin for a few seconds then touch the solder to the iron.  The solder naturally seems to flow around the pin.  Just make sure the hole around the pin is completely filled.  One caution is: heating the pin for too long might damage the board or the breadboard.

After soldering all of the connections, I used a multimeter to test for shorts.  I set the multimeter to test for resistance.  Then, I put one lead on one pin, and the other lead on the pin next to it.  If the pins are connected by bad soldering, the resistance would go to zero.  I did not find any shorts.  Huzzah!

The picture below shows the FTDI adapter from LowPowerLab connected to the Moteino.  The adapter makes it easy to connect a PC to the Moteino.  The Arduino IDE application sees the Moteino as an Arduino Uno.

Moteino Software
The LowPowerLab website has a lot of good information about the Moteino.  The guy who made the Moteino also has Arduino programming libraries on Github.  The website has good information that I will not repeat here.

One thing I had to do was put the Arduino files in the proper place.  I use a Linux laptop as my Maker device.  So, my Arduino sketches are in the /home/kbecker/sketchbook folder.  I moved the Moteino sketch folders into the libraries folder in the sketchbook folder.  One thing I learned is that it does not matter what the name of the sketch folder is as long as it is in the libraries folder.  I renamed the sketch folders so they start with "Moteino_".  I was able to compile one of the RFM69 sketches.

Next Steps
In order to test the Moteino, I need another RFM69 transceiver.  I did buy an RFM69 with the intention of connecting it to my Raspberry Pi.  However, I can't find much support for that on the internet.  So, I will have to figure it out myself.  Physically connecting the hardware will probably not be that hard.  The difficult part will be writing the software for the Pi to connect to the transceiver.

Another idea in the short-run would be to connect the RFM69 to an Arduino Uno.  Then, I can use the Moteino sketches on both the base and the node just to make sure it works.

Finally, I would like to design a board for the node.  The board would include the Moteino, a coin battery holder for power, connections for the sensor (DHT22 on the first one), and (if I can figure it out), a circuit to measure the power level of the battery.

I'll keep posting as I make progress.  I'll also add a new project on my Makerspace wiki page.

Friday, November 21, 2014

Electric Razor Fixed

We have a Remington Precision electric razor that my wife uses to cut the kid's hair.  The other day it started acting up.  Wiggling the wire would make it turn on or off.  Obviously, there was a break in the wire.

I was at the Milwaukee Makerspace tonight and brought the razor to repair.  It took me about an hour to do the work but I think I fixed it.

There is only one screw holding the case together.  After removing the screw, the case comes apart with a bit of coaxing.

One of the wires on the power cable connects directly to the power switch.  The other wire is connected to a wire from the razor via a crimp connector.  The first step was to de-solder the wire from the power switch.  I could not find any de-soldering wick so I just applied some heat and forced the wire off.

Rather than cut the wires going into the connector and shortening the one from the razor, I used a vise to expand the connector and remove the wires.  That was surprisingly easy.

After disconnecting the power cable from the razor, I cut the wire just below where I thought the break in the cable was.  Next, I stripped about one inch off of the end of each cable.  The existing cable was tied in a knot that looked like a pretzel.  I tied the end of the remaining cable into a similar knot.

The final steps were to reconnect the individual wires to the switch and the razor.  I soldered one wire to the switch.  The other wire was connected to the wire from the razor.  I was able to use the original connector and re-crimp it.

I tested the razor and it appears to work!  Looks like I saved $30 by fixing it myself at the Makerspace.

Saturday, October 18, 2014

Recent Updates to HESA

I've been spending time in small bursts recently working on the code for the Home Environmental Sensor Array.

Status Page Updated with Graphs
First of all, I updated the HESA status web page to display a graph of the current day's settings.  I found some php code called PHPGraphLib that makes it easy to create graphs with PHP.  In order to use PHPGraphLib, I made a new PHP page that reads today's readings from the database and puts them in an array variable.  Then, the data in the array is added to the class for the graph.  Finally, PHPGraphLib dynamically creates the graph as an image file on the server.  The main HESA status page calls the php page with the graphing code.  The PHPGraphLib page has some good documentation and was fairly easy to get going.

I also changed the HESA status web page to have a simple table with the high, low, average, and current readings for each sensor.  There are links to bring up the last 48 readings for each sensor.  In the future, I would like to make graphs for monthly and yearly data.

The final change I made to the Hesa status web page is to show at a glance if the HESA is working or not.  It checks the last time something was written to the database.  If the last update time is over an hour old, the title of the page changes.  Also, the status shows up at the top of the page.  Now, I can tell if the HESA is transmitting or not just by looking at the title of the web page.

Basic Design Failed.  Design Changed.  Backup Pump Added.  
Recently, I was replacing the sump pump in my basement.  While the pump was out, the water softener turned on and started dumping water into the crock.  When the crock filled up, the HESA detected the water and shut off power to the water softener -- exactly as designed.  What I found out, is that the water softener continues dumping water into the sink without electricity.  In other words, shutting off power to the water softener does nothing.  Yar!

In order to fix this design problem, I did a couple of things.  First, I bought a submersible pump and battery powered sump pump but I would prefer to have a battery backup solution for the whole system.

added it to the crock.  The submersible pump will move water from the crock for the basement sink to the crock for the drain tiles.  The sump pump in the second crock will then move the water outside.  This will help when the first sump pump fails for some reason.  I still have a problem when the power in the basement fails.  Yes, I could have a

Finally, I changed the programming on the HESA so the Power Switch Tail is normally off.  When the HESA detects water, it sends a signal to the PST to turn it on and provide power to the submersible pump.  This is the opposite of the way the HESA provided power to the PST originally but it fixes the design flaw.

Send All Clear Message
One small improvement I made is to send an "all clear" message to the email address if the water goes away.  Now, when I am doing some testing, people will get a follow-up email when all is well.

HESA Not Transmitting
I have been having problems with the HESA not transmitting.

First, There were some bugs in the code that would stop the program if it could not reach the internet.  I fixed those.

Next, the GFCI outlet that my network hub was plugged in to would trip on occasion.  The HESA would stay running but it could not send any data to the internet.  I had to fix this because the sump pump was also plugged into the same power outlet.

That GFCI outlet has a freezer plugged in to it, plus the sump pump, and a power strip with my network hub and a small clock.  For some reason, the outlet would trip when the sump pump tried to run sometimes.  Perhaps it was when the freezer motor was also kicking on.  I solved this problem by adding a bigger outlet and a second GFCI outlet.  Now, the freezer has its own 20 amp GFCI outlet.  The sump pump and power strip share the other 20 amp GFCI outlet.  I have not had any more problems with the GFCI outlets tripping since I made this change.

Even after these changes, once or twice a week, the HESA still stops transmitting.  When I check the processes that are running, there is no HESA program.  It appears that some kind of run-time bug causes the program to stop.  I need to start recording everything that happens in a log file so I can see where it stops.  Then, I can fix the code to handle the errors.

Until then, I made a change the /etc/rc.local file to hopefully restart the program if it fails.  Here is the code.

until sudo python /home/pi/python/hesa.py; do                
    echo "HESA crashed with exit code $?.  Respawning.." >&2 
    sleep 1                                                  
done                                                         

The HESA rebooted and started just fine.  We'll see if this change to the rc.local file fixes the HESA from stopping or not.

Friday, October 3, 2014

Power Connector for Chromebook Fixed

After about nine months of use, the power supply for our HP Chromebook stopped charging.  It looked like some wiring broke close to the end of the connector.  Too much flexing where the cable plugs in to the computer finally caused the wire to break.  What to do?

Best Buy sells a universal charger for $55.  That's bit steep.

Fortunately, I am a member at the Milwaukee Makerspace.  A few Fridays ago, I took the broken PSU to the 'space in hopes of saving myself $55.

My first idea was to find a power supply with a similar end.  I looked through the power supplies on the hack rack at the Makerspace.  There were plenty of old PSUs on the rack but none were an exact match.

Option two was to fix the connector on the current PSU.

To start, I cut away the plastic covering on the connector to reveal the wires.  Curiously, there are three conductors in the cable -- one white, one black, and one blue.  The white wire is hot.  The black wire is the return.  No idea what the blue wire is for.  I probably would need to break open the power supply brick to see what the blue wire is connected to.

The white and black wires were a bit frayed.  This was the problem.  I cut through the wires to separate the connector from the PSU.  Next, I used a Dremel tool to grind away the hard plastic that covered the connections on the connector.

Finally, I soldered the wires to the connect.  Heat shrink tubing was used to cover the wires.  The hole thing was also wrapped with electrical tape.

A quick test showed that the repair was good.  It has been charging the Chromebook for the last few weeks.

It felt good to fix the PSU.  Plus, saving $55 pays for one month at the Makerspace.  Bonus!

Friday, September 5, 2014

phpMyAdmin Works on HESA

I spent Labor Day weekend working on the Home Environmental Sensor Array on my Raspberry Pi.  I want to start reading and writing data on MySQL tables on the Raspberry Pi.  In order to make this easier, I need to use phpMyAdmin on my laptop to manage the MySQL databases on the Raspberry Pi.  There were several things I had to do to get this working.

First, phpMyAdmin tries to only connect to the MySQL server on the localhost.  I found a web page that explained how to get phpMyAdmin to connect to MySQL on another device.  Basically, I had to edit the config.inc.php file in the /etc/phpmyadmin folder.  The lines below were added after the section like it that setup the localhost connection.
$cfg['Servers'][$i]['verbose']         = 'HESA';$cfg['Servers'][$i]['host']            = 'hesa.local';$cfg['Servers'][$i]['port']            = '3306';$cfg['Servers'][$i]['connect_type']    = 'tcp';$cfg['Servers'][$i]['extension']       = 'mysqli';$cfg['Servers'][$i]['compress']        = FALSE;$cfg['Servers'][$i]['auth_type']       = 'cookie';$i++;
One thing to note is that these lines can be added to this file for every server that you want to control with this copy of phpMyAdmin.

Next, I had to go to the Raspberry Pi and tell MySQL to allow connections on the public internet connection and port 3306.  This is done by editing the /etc/mysql/my.cnf file and changing the bind-address variable in the [mysql] section to the local IP.  In my case, it looked like this:
bind-address = 192.168.0.58
Finally, I had to setup security for the users in MySQL.  I started up the mysql command line tool and executed a command like this:
GRANT ALL PRIVILEGES ON *.* TO 'USERNAME'@'%' IDENTIFIED BY 'PASSWORD' WITH GRANT OPTION;
Now that I am documenting all of this, it seems pretty simple. Its hard to believe that I spent so much time trying to get this to work.  Here is the end result.  Now, there is a Server Choice dropdown that shows all the servers, I can connect to from my laptop.


After getting this working, I created tables for the data that I store on the rynok.org website.  I also mostly copied data from the production site to the database on the Raspberry Pi.  The RJ comments table did not fully copy.  There is probably something wrong with the variable size for the id column.  I'll deal with that later.

Tried Soldering the USB Connector to the PCDuino

I did not post this right away but about two weeks ago, I attempted to re-attach the USB port to the pcDuino that I am working on.  The USB port got disconnected soon after I started working with the pcDuino.  The design of the board is such that a USB cable does not fit correctly when an HDMI cable is plugged in.  The first picture below shows the USB port separated from the board.


The picture below is me trying to solder the USB port back onto the board.  I used a microscope at the Milwaukee Makerspace to see the work since the connections were so small.  I tried to take my time to do it right.  The USB port was solidly connected to the board when I was done and it looked like a decent job but the board still does not power up when I plug a USB cable into it.