Advertisement

Sunday, December 29, 2013

Avahi Installed on HESA Computer

Tonight, I took a few minutes to install Avahi on the Raspberry Pi that is installed in the Home Environmental Sensor Array.  Now, I can connect to the RPi at hesa.local on my home network.  It works with ping, ssh, and to web pages hosted on the RPi with Apache.  Hopefully, it works on the network at the Milwaukee Makerspace as well.  Thanks Pete and Jason for the advice!

Here are the instructions I followed:

Executed sudo apt-get install avahi-daemon

Executed sudo insserv avahi-daemon

No messages received either way.

Executed sudo nano /etc/avahi/services/multiple.service and created a file with the text below.
<?xml version="1.0" standalone='no'?>                 
<!DOCTYPE service-group SYSTEM "avahi-service.dtd">   
<service-group>                                       
        <name replace-wildcards="yes">%h</name>       
        <service>                                     
                <type>_device-info._tcp</type>        
                <port>0</port>                        
                <txt-record>model=RackMac</txt-record>
        </service>                                    
        <service>                                     
                <type>_ssh._tcp</type>                
                <port>22</port>                       
        </service>                                    
</service-group>                                      

Executed sudo /etc/init.d/avahi-daemon restart

Saturday, December 28, 2013

LEDs for Tardis

I was at the Milwaukee Makerspace yesternight to look for LEDs and research a circuit for the LEDs to add to the Tardis.

I did find some LEDs that fit in the light holder but there weren't any white ones.  I need five ultra-bright white LEDs.  The power source will be one 9v battery.

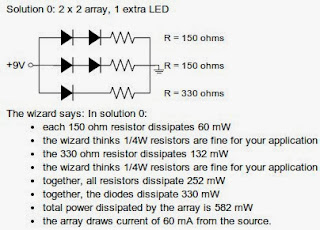
I talked to Ron about how to figure out what resistors to use and then did some research on the internet.  I found an Instructable that explains the process.  The Instructable pointed me to a website that will calculate the resistors needed in a five LED array.

Here is one of the schematics that the website came up with.


I tested the circuit on a breadboard and it worked.  None of the LEDs blew up. 

Next, I need to get some ultrabright white LEDs.  I might even have to go to the 'Shack. 

Successfully Backed Up HESA SD Card

Now that the HESA is up-and-running, I finally made a backup of the SD card.  Basically, you use the same Win32DiskImager software that you used to install the Raspberry Pi distribution on the SD card.  Lifehacker has some good instructions for backing up the SD card.  I'm not going to repeat the instructions here.

Not only did I make a backup of the SD card to the C: drive of my computer, I installed the backup image to a new SD card and installed the copy in the Raspberry Pi.  It worked perfectly.  The RPi is running it on as you read this.  Awesome!

One interesting thing is that the original SD card was 4gb.  The copy I made went on an 8gb SD card from a different manufacturer.  I was skeptical that it would work but that was the only extra SD card I had.

By the way, I've already dropped two screws into my sump crock.  I think I need a better way to attach the acrylic to the front of the enclosure.

Wednesday, December 25, 2013

HESA program now starts automatically and updates a local web page

I made two small changes to the HESA program on my Home Environmental Sensor Array.  First, the raspberry pi will now execute the HESA program when it starts up.  No one has to be logged in for it to run.  This was accomplished by modifying the /etc/rc.local script.  I added this line to the script.

sudo python /home/pi/python/hesa.py

Also, I added some code to the python script so it will update a local web page with the current status of the HESA.  The code updates the web page every 10 minutes (more-or-less).  For now, this will let me check to make sure the HESA is working without having to go into the basement.  In phase 2, I would like to have the program update a web page on the internet and possibly a database.

HESA Installed in Basement

Today, I spent about an hour installing the Home Environmental Sensor Array in my basement.  I know.  It's CHRISTmas day.  But, I had some time before the in-laws came over for lunch, and I borrowed my brother-in-law's hammer drill over the weekend.  I wanted to use the drill and give it to my in-laws to take back with them since my brother-in-law lives near them.

I drilled two holes in the wall with the hammer drill and screwed in two screws.  I had to put nuts on the screws to keep the enclosure from falling off.  The screw heads were smaller then the opening.

After hanging the HESA on the wall, I ran a network cable from my network hub in another room in the basement to the HESA.  I did not have any male connectors so I put a CAT5 keystone jack on each end.  Then, I plugged cables in to each keystone jack.  That is not ideal but I wanted to get it done.

I plugged everything in to the enclosure and fired up the power.  All the lights on the pi turned on and blinked as expected.  I also plugged a night light in to the duplex power switch that the water softener is also plugged into.  When the night light is on, the water softener has power as well.

Finally, I connected the cable that will detect water to the bottom of the enclosure.  I started the program that looks for water and tested it.  It works!

Phase one is now 95% done.  I need to wrap up a few loose ends and then, I can move on to something else.


Saturday, December 21, 2013

HESA Enclosure Finished

Yesterday I "finished" the enclosure for the Home Environmental Sensor Array that I am building.  I say "finished" because its done enough for me to mount the HESA on the wall in my basement and turn it on.  There are always things to improve but its good enough for now.

The enclosure needed some holes to install the last components.  I was at the Milwaukee Makerspace last night to work on this.  The last time I put holes in the enclosure, I drilled some starter holes and then used a hand file to remove the rest of the steel.  It took a lot of elbow grease to make two small holes.

This time, I needed to make two larger holes in the enclosure -- one for a duplex electrical outlet and one for the network outlet.  Fortunately, there were more people at the Makerspace on this Friday night.  Tom G. and Ron helped me find a better way to make the holes.  I still drilled some starter holes in the enclosure.  Then, I used Ron's Bosch Jigsaw and a metal cutting blade to cut the holes.  The holes are both simple rectangles that let the entire component fit into the enclosure.  It was fairly easy to cut the holes with the Jigsaw.  Thanks Tom and Ron for the help!

The next step was to permanently install all of the components into the enclosure.  Tom G. gave me a cool looking grey duplex outlet and metal cover plate.  I connected the outlet to the enclosure with two #6 metal screws and nuts.

I found an ethernet cable on the hack rack at the 'space and connected one end to a keystone jack from Belkin.  The only Belkin faceplate I had has four openings.  The jack went in one opening and the other three are empty for now.  I'll have to buy a single or double outlet cover to fix that.

While I was working with the enclosure, the neutral wire that was soldered to the 120v power input plug came off.  Rather then resolder it on, I removed all the wires from the plug, crimped flat blade connectors on each wire, and attached them to the plug.  Now, I can remove them easily if I want to take components out of the enclosure.  That sounds like a best practice to follow going forward.

After getting all the external connections installed, I installed the components on the inside of the enclosure.  This included the USB power supply for the Raspberry Pi, and the Pi itself.  I also had to move the Powerswitch Tail slightly to route the power cable to the duplex outlet.

At first, I was going to use standoffs to elevate the raspberry pi slightly.  However, the screw hole on the pi is smaller then the screw used in the standoff.  So, I just ended up screwing the pi directly to the wood.  I hope there are no issues with heat.

Not sure if you see it clearly in the picture but I used a piece of electrical wire and some eyehole connectors to keep the USB power supply from moving.  Its probably not a permanent solution but it helps me get this phase of the project done.

I was going to have a circuit board to go between the raspberry pi and the other parts.  However, since the water detection circuit is now rather simple, and I just want to get this phase done, and because I would probably have to replace the circuit board in phase 2 of this project, I just wired the parts directly to the pi.  I also, for no specific reason, connected the full-time 5v power to an LED that was already in the case.

After installing all of the parts, I needed to test the HESA.  Now that the pi is in the enclosure, it is difficult to connect a keyboard and monitor.  I can use ssh to remotely connect to the pi but I need to know the IP address.  There is a Linux utility called nmap that will help you find all of the devices on a network.  I installed it and then typed nmap -sP 10.1.1.0/24.  This showed me a list of all IP addresses on the Makerspace network.  I then tried connecting to the devices using ssh (ex. ssh 10.1.1.230 -l pi)  until I found my pi.  I wish I could find a way to always connect to my raspberry pi using its host name on any network I am on.  Then, I could connect with ssh right away.

The HESA works as designed.  Excellent!

Next steps.  Now that everything basically works, I need to get the enclosure installed in my basement.  I have to drill a couple of holes in the concrete blocks, put some bolts in them and then hang the enclosure on the bolts.  Next, I need to run an ethernet cable to that spot.  Then, I can do the final testing and complete phase 1 of this project.

For phase 2, I will do the following:

  • replace the raspberry pi with a Beaglebone Black.
  • install a 16x20 LCD screen in the front panel of the enclosure
  • trim the sides of the enclosure and laser etch something about HESA into it
  • add more sensors
  • add status lights (maybe)
  • make a circuit board for all of the connections
  • record readings to a database on the internet
Sunday, December 15, 2013

Fixed Some Entertainment Devices

Recently, I worked on some broken devices and got them back to working condition (more-or-less). 

First of all, I fixed a Toshiba 32“ HD LCD television that my in-laws were going to throw out.  I was able to find the owner's manual and service manual on the internet.  The service manual had troubleshooting steps that were very easy to follow.  Using my trusty multimeter, I was able to determine that the tv had a bad circuit board (p/n STW37T VTV-3707 REV:1).
Back to the internet.  I had no luck looking for the part on normal reseller pages.  Eventually, I found a used circuit board on e-bay.  I bought it and installed it in the television in about 20 minutes.  Now, the tv works great. We have tested it as a TV, hooked it up to a VCR, connected it to an HD device, and a PC. Right now, the TV is a monitor for our Xbox and kids PC. All of the inputs are working.

Speaking of Xboxes, I worked on two broken ones this weekend. One of the xboxes would not read any DVDs. I took the DVD drive apart and cleaned the laser lens and the mirror. It still does not read all DVDs but it does read some. This xbox has a Thompson brand DVD drive. That is the most unreliable brand according to the Internet

The DVD drive on other Xbox would not open at all. I found some videos on YouTube about how to fix this problem. Basically, there is a small rubber belt on a pulley and gear near the front of the player. Apparently, the pulley and belt get dirty.  This is the most common reason the drive will not open.  Fixing the problem is simple (once you get the drive open).  After taking off the belt, I cleaned the pulley with alcohol.  Then, I cleaned the belt with soap and water and reassembled everything.  The drive opens and closes just fine now.

Friday, December 13, 2013

Printed Prototype Wobbly Chess Piece

I would like to print the wobbly chess set I found on Thingiverse.  The author says it will take 60 hours to print everything so it will be a challenge.  I only have about four hours per week to print stuff on the Makerbot Replicator at the Milwaukee Makerspace.  At that rate, it would take almost four months to print everything.

Just for fun, I printed one piece and one square of the board.  If I wanted a permanent piece, I would use different colors for the top and bottom.

The piece has some trouble standing on its own.  I sanded the bottom a bit flatter and I can get it to stand by itself if I am careful.  However, the wobbly nature of the piece might make it annoying to play with.  Maybe I need more weight in the bottom than the nut I used.

Tested New Water Detection Circuit

I worked on the Home Environmental Sensor Array at the Milwaukee Makerspace tonight.

First, I made a bit more progress on the enclosure.  I took some wire connectors off of some junk in the hack rack at the 'space and installed them in the bottom of the enclosure.  They will be used for the water sensor wires.  I'm not sure that this will be the long-term solution but for now, it is a semi-permanent way to connect the wires.

I had to move the power cable to another opening to make room for one of the connectors.

I am thinking that I will add a male 120v power connector to the right side of the enclosure.  I might also add a CAT5 network connection for the network cable.   Finally, it would be a good idea to have a whole strip of in and out connectors for the other sensors.  Tom G., another Maker, was at the 'space tonight working on circuit boards for a sensor board he is making.  He is using RJ11 jacks as inputs for his circuit plugs.  Maybe that would work for me as well.

After getting the HESA setup in the enclosure, I tested the simplified circuit that my nephew, Jason suggested.  It is the same circuit that I started out with in the beginning--the Raspberry pi sends power out one wire and looks for power coming back in a second wire.  The difference now is that I have the Raspberry pi creating a pull-down resistor on the input side.  The pull-down resistor ensures that any ambient current goes to ground and does not trigger a false reading.  In other words, the input current is always 0 volts until the real current comes across it.

I ran several experiments on the new circuit to make sure it works.

Experiment #1: Ran the HESA water detection program without connecting the leads.  It basically
continually sends power out one wire and looks for a signal on the other.  The program ran for about fifteen minutes.  I never got a false reading.  Success!

Experiment #2: I put some water from a bottle of purified water that was "mineral enhanced for taste" in a plastic shot glass.  Then, I fired up the circuit and put the leads in the shot glass.  The HESA program immediately detected the current and shut off the power to my simulated water softener.  Success!

Experiment #3: Got some Lake Michigan water out of the tap in the bathroom sink at the Makerspace.  Put the leads in the shot glass.  The HESA program immediately detected the current and shut off the power to my simulated water softener.  Success!

Experiment #4: Used water from the water cooler at the Milwaukee Makerspace.  It is also Lake Michigan water but it goes through a filter.  Put the leads in the shot glass.  The HESA program immediately detected the current and shut off the power to my simulated water softener.  Success!

I think we are ready for final assembly.

Saturday, December 7, 2013

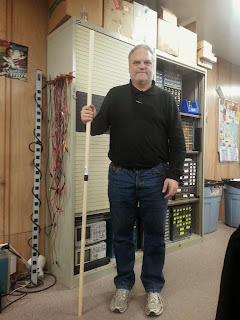
Started Making a Wizards Staff

My son is going to play a wizard in a high school play in January.  He wants a staff to use as a prop.  We are going to make a staff based on an Instructable for Gandalf's staff.

I went to Michaels and bought two three foot (3') long, one inch (1") diameter dowels.  I would have liked to get longer dowels but they did not have any.

I was at the Milwaukee Makerspace yesternight and spent a bit of time connecting the two dowel pieces together.  First, I used the metal cutting bandsaw to cut the head off of a 5/8", six inch long bolt.  Then, I used a hand drill to drill a hole on the end of each of the dowels.  I inserted half of the bolt into one of the dowels.  Then, I put Gorilla Glue on the other half of the bolt and on the surface of the dowel.  I connected the two pieces and secured them with electrical tape.

The finished staff appears sturdy.  The next step is to cut a bit off of each end to get the height right and then decorate it to look like a tree branch.

(Not sure who that geek in the picture is but the staff looks good.)

Progress on new HESA Enclosure

Yesternight, I spent about eight hours at the Milwaukee Makerspace working on a couple of projects.  One of the main things I worked on is the new enclosure for my Home Environmental Sensor Array (HESA).  I needed a bigger enclosure to house the Powerswitch Tail relay as well as the Raspberry Pi and any circuit boards.

In another post, I mentioned that I found an enclosure at the Makerspace that was big enough for the HESA project.  I needed to get it ready to hold my project.  First, I cut a piece of plywood that I found at the 'space to fit in the back of the enclosure.  I used a table saw to cut the wood (no time to mess with the CNC router unfortunately).  I drilled holes to attach the board to the enclosure and to hang the enclosure on the wall.  The enclosure is now ready for components.

Next, I removed the power switch and 120 volt power plug from a PC power supply to use as the main power input on the enclosure.  A power cord will plug in to the enclosure to supply power.  The switch will allow power to flow to the components in the enclosure or not.

I had to cut holes in the metal side of the enclosure for the parts to fit.  There might be better ways to do this with all of the cool tools we have at the Makerspace but I chose to use a crude method.  First, I drilled holes in the enclosure around the inside edge of the square that I wanted to remove.  Then, I used cutting pliers to remove the metal.  Next, I used a square hand file to remove the rest of the metal and smooth out the holes.  It took about an hour to make the two small holes but it worked pretty well.

The next step was to install the Powerswitch Tail into the enclosure.  I had to solder some wires between the switch and the power plug.  Then, I connected the wires to the PST and attached the PST to the wood with some short screws.  I connected the Raspberry Pi to the PST and tested the circuit.  It worked as it did before.

When I finished the test, it was after 11:00pm.  I would have liked to work on the water detection circuit but there was not enough time.  I also regret not taking more pictures.  Overall, it was another good day at the Makerspace.